One of the best ways to relive the past is with vintage equipment. A gentleman in Oregon was throwing out several radios, and I stepped in to save them – at least try to. I got four radios in the shipment, and this one averaged out to be a $20 investment with the USPS shipping costs.
The unboxing ceremony revealed a Silvertone 10 Clock Radio costing $24.95 in 1951 ($303 in today’s money) – quite an investment. The station tuning dial pointer was missing, the power cord had been cut and the Bakelite exterior was caked with dirt, nicotine, paint and debris. Obviously, it needed love.
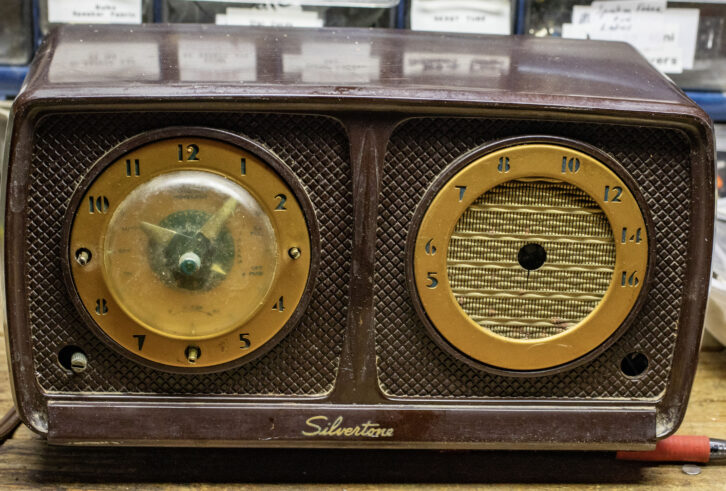
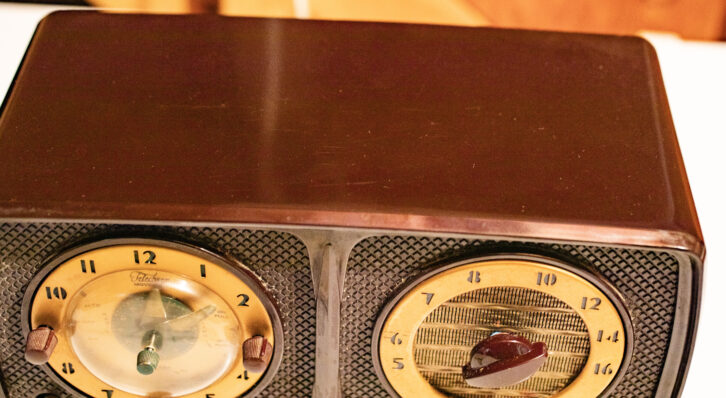
When repairing vintage equipment, I always go to www.radiomuseum.org to download the schematics. Not knowing what I was walking into, at least I would have a road map to follow. This is the “before” image – the way I received it.
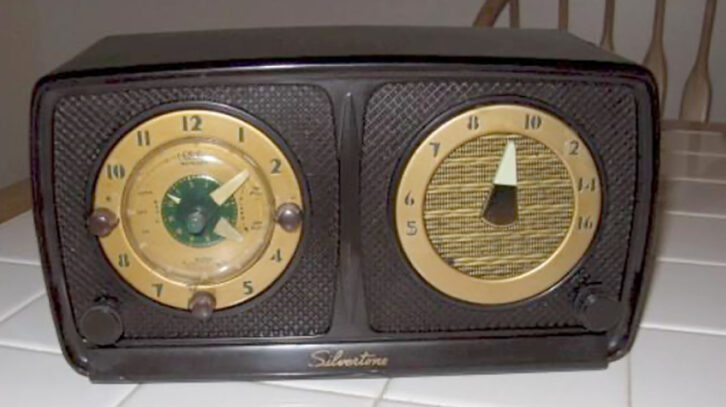
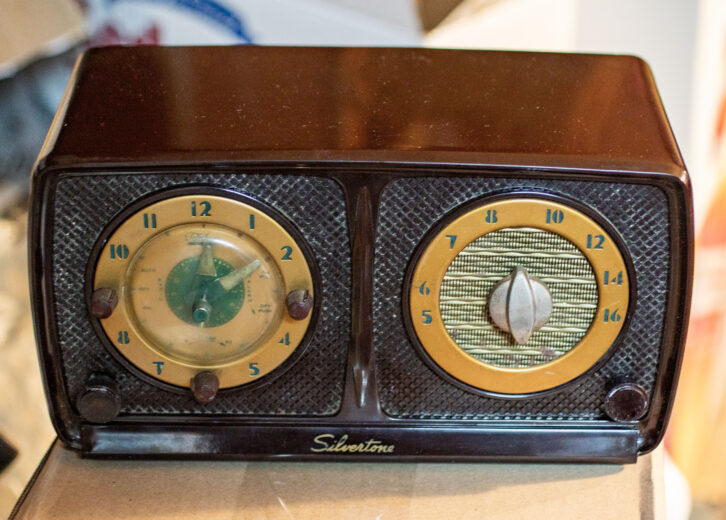
I found an image of what the Silvertone should look like.
Beginning the cleaning
Removing the clips that held the back in place, it was unusual to see the tubes in this facing-up configuration. Usually, the tubes are in a vertical position, these were horizontal. With the front knobs removed, the radio was carefully extracted from the carcass. Dust and dirt lining the bottom isn’t unusual and was easily cleaned outdoors with an old brush and compressed air. The remnants of the scum was cleaned with non-ammonia window cleaner. Be careful not to get the labels wet. The missing piece of Bakelite can be repaired several ways: fiberglass cloth, epoxy and making a mold of the vacant area. There are lots of videos on the web that show how to do this.
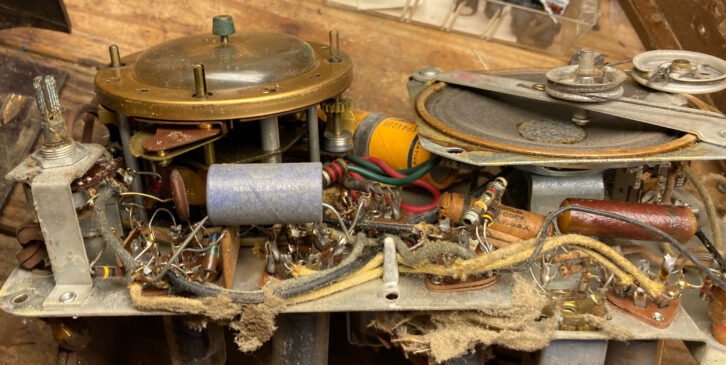
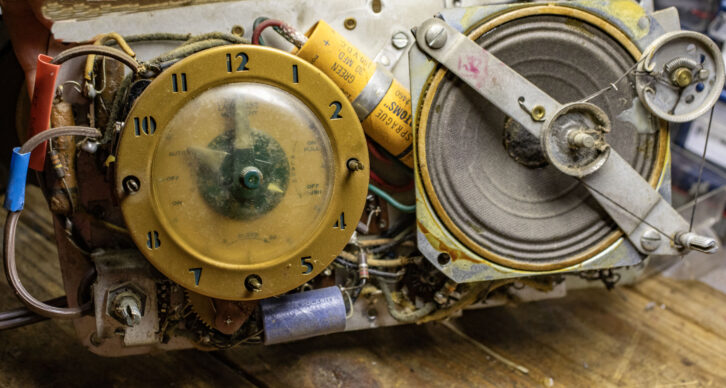
Outside of its case, facing the front, you can see that there is very little wasted space. Capacitors surround the clock portion, and thankfully the dial string was still in place. I’ve replaced two broken dial strings and that was two too many! Dust still clung anywhere it could, and the clock’s face glass needed to be cleaned.
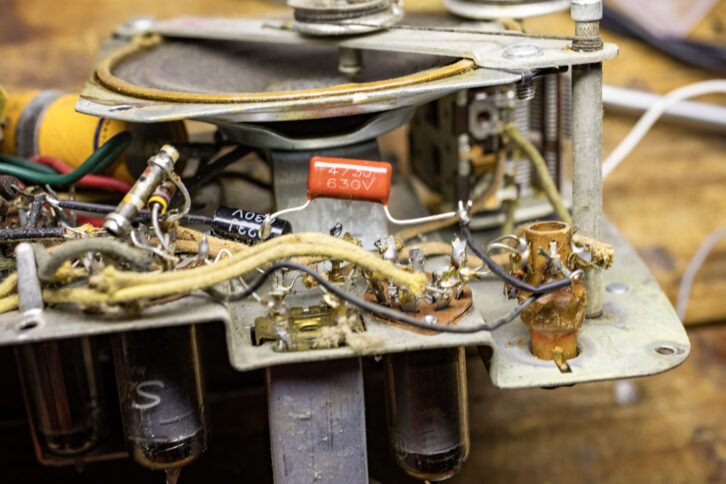
Looking at the underside of the front, you can see left to right. The on/off volume control was quite corroded at the base where it connected to the chassis. The blue electrolytic capacitor needed to be replaced with a modern one, as did the orange combo capacitor in the rear. All wax capacitors also should be replaced because they will no longer be anywhere near their stated value. I don’t usually check the wax capacitors because they are too old. Any other capacitor I would check its value to see if was within range.
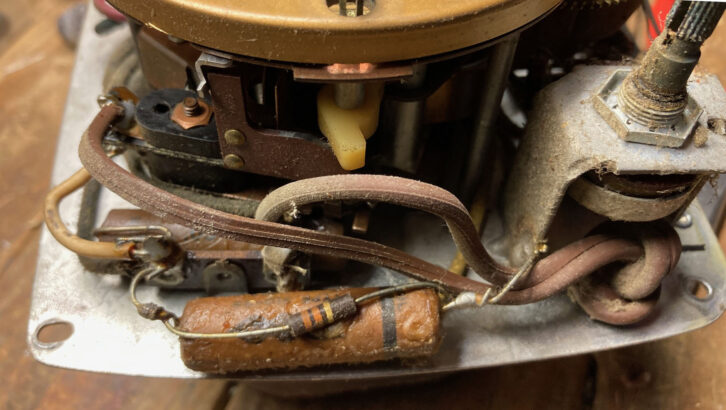
The tuning capacitor – which allows the stations to be dialed in, needed a thorough cleaning as well as lubrication. I replaced the AC cord with a new one with a polarized plug. This is much safer than the original chord, especially if someone touches the chassis and isn’t grounded. This is only one of the many steps that need to be done to make this curtain burner safer for the average person. When cleaning the chassis, tilt it so that the contact cleaning fluid drains off and doesn’t puddle. There are many brands out there, just follow the instructions.
When cleaning tubes, remove them by gently pulling upward rather than rocking them back and forth. Carefully rub them with a heavy-duty paper towel or cloth being careful not to remove the writing on the tube. It’s usually best to do one tube at a time, if you remove them all at once it might be more difficult to remember where they belong.
Safety first
Let me just talk a moment of safety. You’re dealing with very high voltages in old equipment like this. The first step, after you’ve checked everything inside the radio thoroughly, is to use a Variac connected to an isolation transformer. A Variac allows you to control the amount of voltage going to your radio being repaired. You never want to give it a full 120 volts right off the bat – slowly increase the voltage. An isolation transformer will protect you from a potential shock, as most of these radios have hot chassis. If you don’t feel comfortable working with these voltages – don’t!
Make sure you take photos throughout each stage of the repair process. The memory is the first thing to go. I can’t remember what the second thing is.
If you look at the photo, you can see that the wires attaching to the antenna are pretty much shot and two have already come undone. It’s important to make note where these connections attach to through photos. With the original wiring you don’t have a very long leash in which to move the chassis around. Locate where each wire originated. I intend on extending each of the antenna wires, so I have a little more room to play with.
A new AC cord has been attached to the radio. Because a polarized plug is being used, make sure that the hot wire, the one with the ribbing on it, goes to the volume control. The old .05mf wax capacitor is unsafe in its current location – especially if you have a power surge. Also, a .05 microfarad X2 safety capacitor replaced the old wax one. The safety capacitor will work like a fuse, in that if there was a power surge, the X2 capacitor will break rather than let voltage continue through if a normal capacitor would have been used.
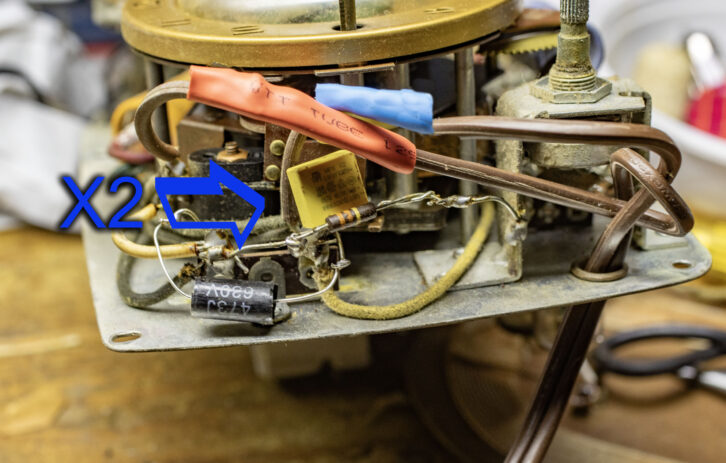
Another old wax capacitor was removed and replaced with the modern one of the same value.
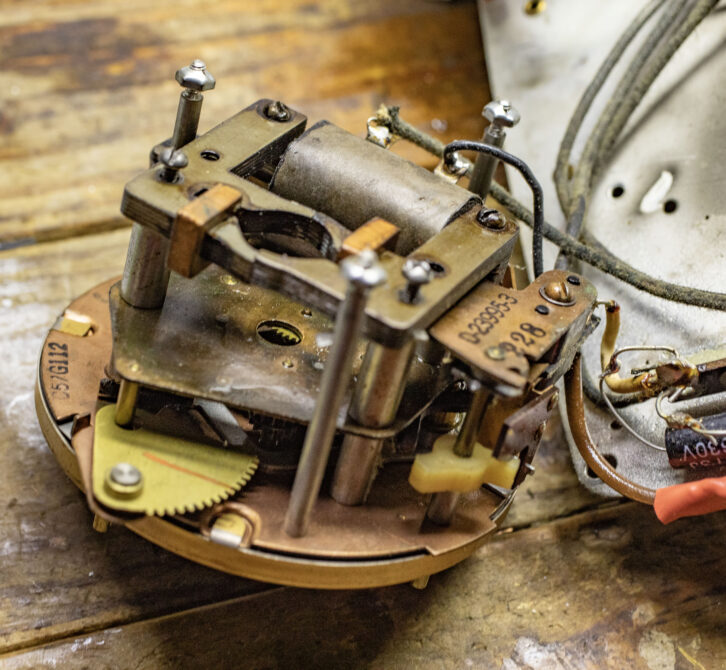
Starving for lube
When tackling the repair of the Telechron clock, remember that most of the time the reason the clock isn’t working is because of lubrication starvation. The clock was lubricated at the factory, but that was a very long time ago. The old oil needs to be loosened, and the motor needs to be re-oiled. The clock assembly is easily removed from the radio. The first step is obviously to take the clock motor out of the housing. The bracket that encloses the clock motor is basically an electromagnet. When power is applied to the magnet, it allows little gear in the motor to move back and forth. This gear is meshed with the larger gears that drive the hands on the clock. Remove the two screws on the left side of the magnetic housing, and that should allow the motor to easily lift out.
A little sidebar here. The clock was sealed at the factory, as I had mentioned. If you break into that, you’re getting air to the gears for the first time since it has been manufactured. If you don’t want to follow the next steps that I will be discussing, there is another way of getting oil into the motor, but you won’t remove the dried oil that’s already in there. Some people on YouTube suggest that you put a three inch piece of one quarter inch diameter plastic tubing over the motor gear, fill that tube with a mixture of WD40 and clock oil. Heat the motor with a soldering iron. As the motor heats, the oil will start to bubble, and then when the motor cools, the oil will flow back into the motor. Theoretically, the WD40 will loosen the gunk. But you never remove it. Other people on YouTube say you should never do this. My solution follows.
A drill solution
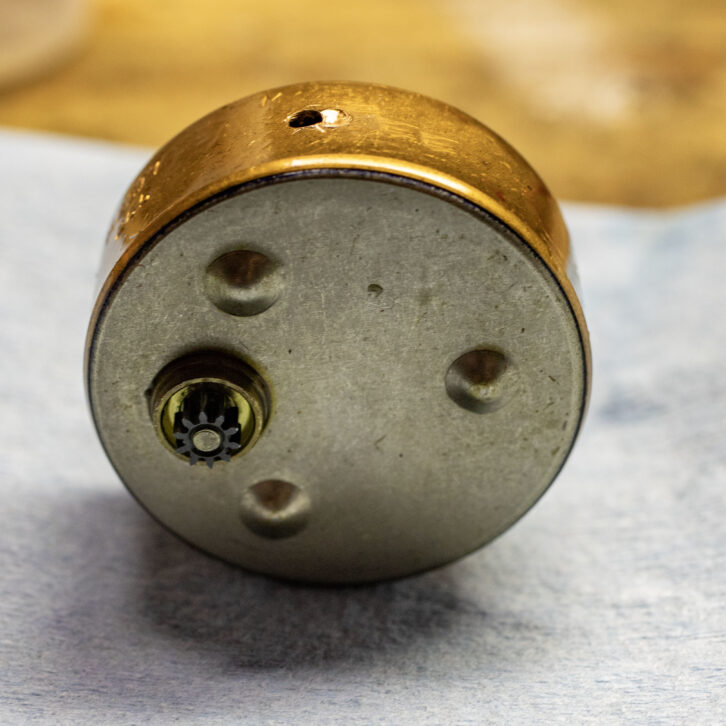
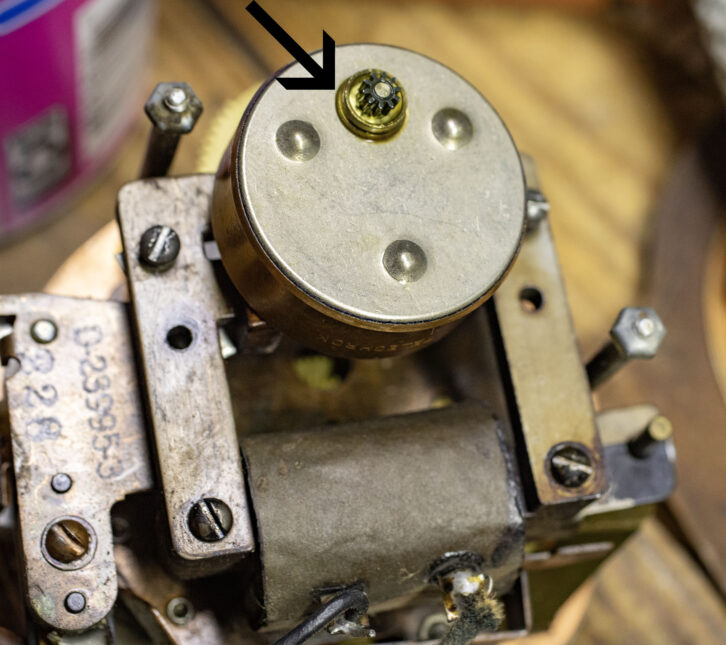
The next part sounds scarier than it is, but it is the best way to remove the old oil and get fresh lubrication into the motor. Hold the gear side of the motor facing you, and you need to drill a 3/32nd-inch hole into the side of the clock motor. Drilling a hole in this position will not harm any of the gears internally. Put a little white lithium grease on the end of the drill bit, clamp the motor securely, and drill slowly.
There are several schools of thought on the next process, but I found that this process works best for me. Spray some Liquid Wrench Penetrating Oil (or a similar type) into a plastic bottle with the needle tip at the end. Some people use hypodermic needles, but I’m a little intimidated using those. I filled the four ounce round bottle about one-third of the way. Squirt it all of the penetrating oil into the hole, and while holding your finger over the hole, shake the motor. Place the motor hole side up, and let it sit for about 24 hours to let the oil do its job.
There are a few ways of removing the penetrating oil, because you don’t want to leave it in there with the new oil you be putting in later. You can try to remove as much as you can using an empty bottle with a needle tip, sucking out the penetrating oil. Or you can place the hole face down on the paper towel and shake it. That also should remove additional oil. Some people even use compressed air blown into the hole to remove the remaining oil. Bear in mind that using this method will send oil everywhere. It will be very messy.
3-IN-1 oil
There are two schools of thought on the next step. One is to put in additional blast of penetrating oil in there to let it soak for 24 hours to dissolve the encrusted oil. You want the penetrating oil to drain clear. If it’s still amber colored – these still old oil in there.
The other method is to put 3-IN-1 oil in as an initial starter lubricant. People on the Web have said never used 3-IN-1 oil, never use WD40 – just use synthetic clock oil. I agree with that for the final lubrication process, however, to clean the workings of the motor, 3-IN-1 oil is an additional lightweight lubricant that will help things move along. This oil will also be drained out. Follow the same process you did with the Liquid Wrench and after 24 hours, remove all that oil. Keep shaking the motor, putting the hole toward the paper towel and let it sit for additional time. Do whatever you can to remove as much of the 3-IN-1 oil as you possibly can.
I chose Liberty Clock Oil as the synthetic lubricant to remain in the clock’s motor. The critical part is to not to put too much oil in. You only want a coat the bottom third of the motor. This is much like the crankcase in the car, you just want the oil splashing around the components, not immersed in the oil. With the size of the clock’s motor, you’re looking at only putting in half a teaspoon or two milliliters of the synthetic clock oil. Once that is in, shake the motor again to make sure everything is coated. To test it, put your finger over the hole and put the motor upside down in the magnetic housing. On a Variac, slowly crank up the voltage and you should see the little gear moving back and forth. Once you’re sure it’s working, remove it and seal up the hole.
You can use either epoxy, super glue, or some kind of strong tape to seal up the hole – or all three. Just remember there will be a lot of lubrication in there sloshing around and you don’t want that leaking through and getting out – make sure the hole is sealed. Once that is done and your sealing method is dry, put the clock motor back in the housing the correct way and tighten all the screws.
Now that everything mechanically has been fixed, the chassis is returned to the Bakelite shell. Double check again and make sure that everything it’s still functioning.
Wear and tear
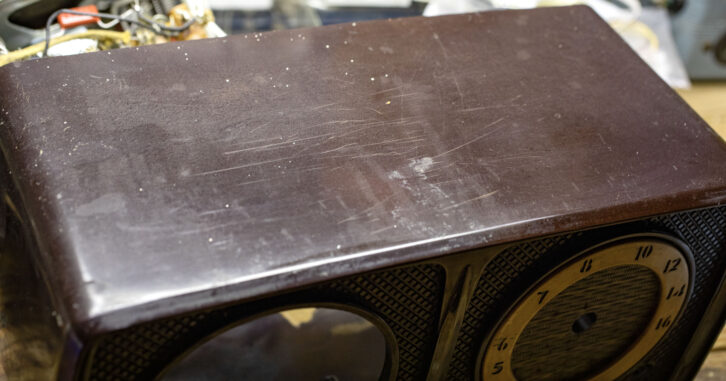
Turning my attention to the top of the radio, I saw a lot of scratches, fleck of white paint, and general wear. Sadly, I’ve never restored a vintage radio that didn’t have flecks of paint on the top. It seems that if you owned a radio anywhere from the 1930s through the 1960s, you had to paint your room and leave the radio out uncovered.
The cleaning process I use, I’ve learned from various people in the business. This step should be done before you return the chassis to the shell. The first step is to use Novus #3 which is a heavy scratch remover. This will remove the deep scratches. Move on to Novus #2 which is a fine scratch remover. The last step is to use Novus #1, which polishes and protects the finish. If you want to take it one step further, you can use carnauba car wax. I prefer the liquid rather than the paste because it’s easier to apply and buffs to a high sheen. This last step can be done in lieu of using Novus #1. The finished top and sides looked an awful lot better, not perfect, but this is a vintage radio, and it needs some of its charm.
Unable to find the exact dial indicator for a reasonable price (they wanted $25), I found another knob that fit and looked like it belonged there.
I found a gold cap that went on top of the dial indicator knob. It added a classy finish to the radio. The entire process of restoring the radio cost me $5 in capacitors. The total investment was $25.
For the love of radio
This whole process was a labor of love, it could never have been done in one or two repair sessions. Looking for parts, retesting after every other component was installed and the things that life normally throws at you, all take time. The most important thing, and sometimes very difficult for me, is to take your time throughout every step of the process. Everyone wants to get the project done, but if you make a mistake halfway through without testing everything it may be very difficult to determine exactly where that mistake was made. I’ve heard somebody on the Web who said “this is a hobby that takes a lot of time and patience. If you don’t have that or don’t want to spend the time necessary, take up a different hobby – like knitting,” he said. Lastly, you have now brought something back to life, it hopefully will have a place in your home or someone else’s who can enjoy the radio.